Lead magnet ideas and templates for the ultimate content upgrade

We’ve been listening to you, so we’re offering lead magnet ideas so you can create your own content upgrade to grow your audience. We’re even including great lead magnet examples and lead magnet templates you can utilize yourself. In fact, we created three videos explaining how to design your own editable workbooks, cheatsheets, toolkits, and checklists. We’ll even explain how all can be used as a freebie, lead magnet, or content upgrade in your online course.
Why three videos? Since we know we all have and use different software, we created a video for each Google Docs, Pages, and InDesign to give you some options when creating your awesome new lead magnets. But before we get into the details of the videos, let’s answer why content upgrades (or lead magnets) are important.
What a lead magnet is
Your lead magnet should be a juicy piece of content that helps solve a pain point and makes your targeted audience’s life easier—whatever your sphere or niche may be. In exchange, they’ll give you their email address.
Designing and promoting content upgrades or lead magnets are not just limited to online course creators either. If you are an author or writer, use them. An artist, use them. A blogger or YouTuber, use them.
Once your audience signs up to get your free resource, two things happen:
- They get content that they love and that helps them. This proves to them that you’re trustworthy, and in turn makes them more likely to buy when you have an online course or other product to sell to them.
- You collect their contact information, including an email address you can add to your list and then use to either give them more free content or sell them something even more valuable.
Lead magnet examples
Here at Teachable, we strongly support giving out free content to your audience.
These are all examples of types of lead magnets:
- Toolkits/Resource guides: A resource guide, often called a toolkit, is a curated list of “tools” your buyer persona would want or need. This saves them time and offers the expertise you’ve gained through your experience.
- Free mini-course: Give potential students a taste of your course with a mini-course. For instance, if you’re creating a 6-week course, you can offer a 6-day course about something relevant that will prepare them and get them excited about investing in your paid offering.
- Checklists: Similar to a resource guide, a checklist is something your audience would find valuable. Maybe it’s an ingredient list if you’re teaching a course on cooking, a supply list if you’re teaching an art or educational course, etc. It might also be a blog post you’ve already written that you condense into bullet points. Checklists can also offer an opportunity to be an affiliate for the goods or services on your list.
- Handouts/Worksheets: Help potential students retain the information you’re sharing with a handout that typically covers the bullet points of your subject matter. A worksheet can help students stay organized and on track, while enhancing their learning experience. These might also be called cheat sheets or worksheets. Typically, worksheets have educational information, as well as blank space for them to write in as they go. In addition to helping them study, they will feel supported and less pressure to remember everything covered. You can offer worksheets as a printable PDF and/or a digital, editable PDF.
- Downloads: One example of a download might be a workbook—an extended version of the aforementioned handout or worksheet. In addition to PDF documents, you might also consider other forms of downloads, such as an audio file, images, etc.
- Webinars: Webinars tend to be very effective because they add urgency. You can offer a webinar at specific dates and times, and even include the recording…
- Video series/content: Offering exclusive video content that allows your students more access and information is an attractive offer because it combines visual and audio appeal. Plus, you can use clips of the video in your marketing plan.
- Podcast: A podcast is also a great way to dive deeper into your subject matter or interview other experts in your field. This provides value to your audience, especially if it’s exclusive content.
- Free trials: A free trial is great for a membership-based offering or offering an inside look at your course or offering. It can also be utilized for products or services. Many free trials require credit card information, which will automatically be charged after the trial is up. However, be aware that this can deter potential customers and isn’t necessary. As long as you collect their email address, this strategy is still a good one.
- Case study: Case studies are essentially success stories that focus on actual clients you’ve worked with. You will need their permission to use it as a lead magnet, and it may only be applicable to certain niches. However, they can be effective because someone else’s success story can purchase other potential students or clients to take your course.
Now, to make a lead magnet (resource) your audience loves, it needs to check off these six boxes:
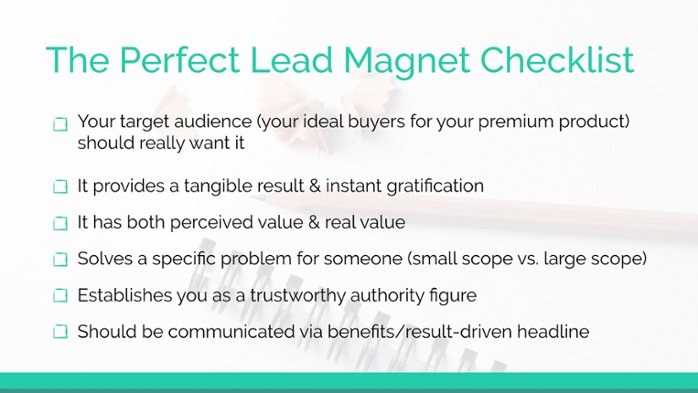
These six boxes hone in on your audiences wants, needs and desires to encourage them to give you their email address.
Why create a lead magnet
Effective lead magnets will help you build your email list quickly, attract potential customers, and make it much easier to sell your course. Additionally, many types can be easy to create and boost your content marketing strategy.
Content upgrades enhance the value of your online course
As mentioned before, worksheets not only help grow your audience, but also increase the perceived and real value of your course. Any extra material you include with your course content, like a workbook, cheatsheet, timeline, checklist, can be used when promoting your course, either on your sales page or landing page, in your emails, or other social media posts to incentivize people to buy. They can also elevate various pricing tiers.
The value of bonus content is tremendous. It shows your students that you care about their success. They’ll see that you took the extra time and effort to create assets to refine concepts, organize ideas, get the insider details, track progress, and ultimately help them remember what they learned.
All of this will only contribute to the success of your students. More success from them, also leads to more success for you via their glowing reviews and testimonials about your course.
Other ways to use (and reuse) your freebie
Now once you create the lead magnet and use it to grow your audience, it doesn’t mean that it’s the last time you can use it. Reuse it!
You can keep sharing it with your audience in many ways, like
- Using it as a content upgrade in a blog post
- Share it in a welcome mat on your homepage
- Post it on your social channels or in groups you are a part of
- Find forums in your niche and share it there
Each of these methods will allow you to share your resource with an interested audience and collect more email addresses.
How to create branded lead magnets in Google Docs
This video covers creating editable content upgrades in Google Docs. Although Docs is a bit cumbersome and does not have all the advanced features as Adobe InDesign (or even Apple Pages), it’s a widely accessible software that allows you to create bonus content that is easily shareable and editable. Plus, it’s 100% free.
In this video, we walk you through creating a content upgrade that can be used either as a tool kit, a cheatsheet, a worksheet, a workbook—and all can be editable.
What’s covered:
- Basic document set up
- Adding page numbers and formatting for two different layouts
- Using headers and footers to create templated design elements
- Formatting images and using text wrap
- Making sections for editable answers
- Saving for your audience to use
One important thing to note about using Google Docs is how to share the worksheet with your audience after you’ve created it. Don’t share the direct link of the document. Instead, go into the document share settings (blue button in the top right corner), and make sure the share link has the “Anyone with the link can view” setting.

Then copy that shareable link, and give it out to your audience. This way, they have to create their own copy of your document so they can write it in or edit it however they want. Otherwise, everyone will be working off your original copy, and it will change each time someone uses it.
Alternatively, if you are creating a cheatsheet or toolkit that is more informational vs. needing to be editable, you can export the document to a PDF and share that with your audience too.
How to create editable content upgrades using Apple Pages
In this tutorial, we show you some basic features, like creating styles, checklists, making tables and other editable elements that will allow you to have a workbook in no time.
The good thing about using Pages is that if you’ve used Keynote, the layout and functionality are very similar, which will make using it much easier.
What’s covered:
- Basic document set up
- Beware of text wrap
- Formatting images and tables
- Creating shape styles and saving colors
- Making it editable in Pages & in Acrobat
One thing to watch out for is Pages’ text wrap feature. Whenever you create a new shape or text box, it automatically adds text wrap around the object, which when it appears on the page, it looks like it deletes elements you’ve already created.
Don’t fret though. Nothing is deleted. It has just been pushed out of the way. All you need to do is select the element you just added to the page, click on arrange, and under the text wrap drop down where it says automatic, change it to none. Then if it has pushed other elements away, they will reappear.
How to use Adobe InDesign to make an editable lead magnets
Since InDesign is a more advanced design program, we created this video on the assumption that you know how to use the basics of InDesign. It is an advanced video, not a step-by-step setup guide. We walk you through setting up certain elements that make creating an editable workbook much easier. Plus, we’ve shared a few of our favorite tricks too.
What’s covered:
- Using buttons and forms to make an editable workbook
- Mastering the master page
- Creating paragraph styles to be used throughout the document
- Some keyboard shortcut
If you’re just starting out with designing resources, don’t feel like you need to use this program. It is an advanced software tool, and as we’ve shown in the other videos, you can create beautiful content upgrades and lead magnets without it.
Top design resources for designing
We can’t write a post about lead magnet ideas and templates without sharing design resources with you.
Images
Type
- Font Squirrel (lots of fonts and are all commercial free)
- Font Bundles (if you sign up for their email list, you’ll get these to your inbox)
Inspiration
- Elle & Co. (Lauren has made a business off of design and her resources are beautiful)
- Pinterest (We use it all the time to search for design inspiration.)
- Creative Market (They send you six new freebies every week)
- Love Plus Color (Jessica’s blog is filled with helpful design tips)
If you’re still on the hunt for the lead magnet ideas and templates that are right for your business, check out this post on developing a strategy to build your audience using lead magnets.
FAQs
What is a lead magnet?
A lead magnet is free or bonus content given to people, typically in exchange for their email address. This could be in the form of a free downloadable e-book or access to a special video. Your lead magnet should be a juicy piece of content that helps solve a pain point and makes your targeted audience’s life easier—whatever your sphere or niche may be. In exchange, they’ll give you their email address. You’d gate this content, so that the only way it’s accessible is through signing up for your email list. It’s a win-win. Your audience will get your awesome guide. And you get to add them to your email list.
What are some examples of lead magnets?
Effective lead magnets will help you build your email list quickly, attract potential customers, and make it much easier to sell your course. Additionally, many types can be easy to create and boost your content marketing strategy. These are all examples of types of lead magnets: toolkits/resource guides, free mini-course, checklists, handouts, downloads, worksheets, webinars, video series, podcast, video content, and free trials.
Tags:
More like this


Your weekly dose of creative chat and Teachable updates. Get our weekly newsletter.